Welcome, Guest. Please login or register.
May 04, 2025, 03:52:45 PM

Login with username, password and session length

Recent Topics

[May 03, 2025, 06:39:16 PM]

[May 03, 2025, 05:50:52 PM]

by jed
[May 02, 2025, 09:57:11 AM]

[May 01, 2025, 05:53:19 PM]

[April 26, 2025, 04:27:54 PM]

[April 23, 2025, 11:10:07 AM]

by [WR]
[April 23, 2025, 09:15:13 AM]

[April 21, 2025, 10:44:08 AM]

[April 17, 2025, 04:48:17 PM]

[April 17, 2025, 08:45:02 AM]

by jed
[April 11, 2025, 01:03:22 PM]

[April 11, 2025, 06:19:31 AM]

[April 07, 2025, 07:03:34 AM]

[April 05, 2025, 08:50:20 PM]

[March 31, 2025, 06:17:42 PM]

Picture Of The Month


Guess who's back?
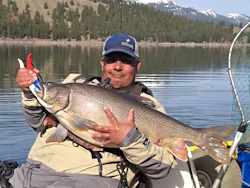
jed with a spring Big Mack

Topic: Trailer revisited (again) Warning... Long Post  (Read 8385 times)

0 Members and 1 Guest are viewing this topic.

NoYaks

  • Rockfish
  • ****
  • Location: Winchester Bay
  • Date Registered: May 2014
  • Posts: 164
So many choices when it comes to trailers. I found it difficult to find the one that would do the job. Specifications on some of the big box store econo trailers have a “do not exceed” 45 to 50 mile per hour rating; accurate or not I left them alone. Also found ones that are rated at highway speed but are much heavier in construction and weight than I wanted to tow behind the Honda.  If you have gone through this, there may be some help in this article.

I intended to use a scupper cart to launch my Predator 13 when I bought the Malone Micro-Sport trailer and the SeaWing kayak mount (photo 1). After launching a few times with the cart, I was looking for a better way and found what some Hobie owners have done with trailers to transport as well as store their Pro Angler kayaks.

A couple of people on the Hobie Owners and North West Kayak Anglers (NWKA) forums posted photos and provided the link to a YouTube video (links at end of post), showing how their new and used trailers have been transformed for hauling and storage of the PA’s. There is a Hobie factory representative who visits their forum and has given the trailer modifications thumbs up not only for transportation, but for use to store their kayaks long term with no hull distortion (visit the forum and ask questions).

Tools Needed:
Read the article to see the tools I used and substitute if necessary to what you have available.

Home D parts list includes:
(1) Uni-Strut (brand) channel cut to fit (I believe this was sold in a 10’ length)
(2) 10 foot Schedule 40 PVC 3” conduit re-cut to 8’ (Home D should cut that for you)
(4) 1 ½’ by ½’ inch bolts and washers to fit the
(4) Uni-Strut mounting spring nuts (5 in a package)
(1) Can of Zink (cold galvanizing) spray paint
(7) 1” X 3/8” bolts, washers and Nyloc nuts for mounting the rear Uni-strut & light brackets
(4) 3” drain covers and PVC cement.
17’ Rubber backed carpet runner cut 9” wide to fit the bunks (30” wide roll sold by the foot at Home D)
(1) Quart Weldwood Contact Cement & cheap throw away brush

Other items from various suppliers:
(1) Pair Bearing Buddies size 1.98 with no threads (Item No. 1980A) from O’Reilly Auto Parts (10% discount with a VA or military I.D. card)
(1) Pair 6” oval, surface mount, Stop, Turn & tail LED lights $22.99 free shipping - ordered on EBAY from Leading Edge Trailer
(1) Aluminum flat stock bent at local metals shop for the tail light mounts Machine screws and Nyloc nuts for mounting lights to aluminum.
(1) Set of Yakima hold down straps (Internet order)
(1) Pair of Yakima ratcheting bow/stern tie-downs (Internet order)
(2) Custom made U-Bolts (see article)

When I returned home from buying the components I got a welcome surprise. The OEM hold-down fixtures and U-bolts from Malone fit the Uni-Strut perfectly (photo 2). What an easy transformation. I cut the rear Uni-Strut at 57 inches long and the front at 24 inch. Malone makes special mention it’s possible to crush the trailer tongue during trailer assembly. Rather than mount the front Uni-Strut to the bare tongue you will notice I moved it back a few inches (from the recommended spacing of 67” so the mount would be over multiple layers of metal (photo 3). In doing so I tried to use the Malone U-bolts and found they would work, but in my opinion would not have an adequate number of threads protruding above the Nyloc nut. There is a trailer supply company in town that made me two U-bolts with 1 inch longer legs.

I used a chop saw to cut the PVC tubes to 8 foot long (I’ve read some use longer including the full 10’) and measured back 12 inches on one end to drill the rear mounting hole. I started with a long ¼” drill bit to drill straight through then used a ½” bit for the bolt hole on the bottom and a 1” hole-saw on the upper side so the bolt and socket would fit from the top. After loosely mounting the rear ends I site drilled the front hole with the ¼” bit and used the ½” bit and 1” hole-saw as above.

Last is adjusting the distance between the tubes. Hobie factory representative suggest the most durable part of the hull is near the scupper holes; on the Pro Angler 14 a 12” to 12 1/2” on center width works out nicely (be sure to measure yourself). With the Old Town Predator 13 the tubes are adjusted to 15 ½” on center to support the kayak, directly under the scupper holes. Looking at the bottoms of the Outback and the Revo 13 I believe their hulls would rest nicely on round bunks as well (measure and adjust to fit).

While wandering the isles of my local Home D looking at various parts and pieces I found the 3” drain covers that fit (glue) inside the tube; certainly not premeditated just turned out I like the look. After gluing in the covers I considered the possibility of invasive species contamination. Using the 1” hole-saw I created a 1” by 2 1/2” oval slot in the bottom of the PVC tubes to make it easier to clean after a launch (not visible).

Photo 4 shows the beginning stage of the contact cement of the rubber backed carpet for the bunks. Photo 5 shows where I decided to eliminate the Malone U-bolt hold downs and instead bolt the Uni-strut directly to the rear cross member (3-nuts & bolts). Photo 6 shows the completed bunks; the arrows point to Yakima ratchet hold downs (also available at Home D under a different brand). Since the trailer assembly instructions mention the possibility of damaging the tongue, instead of buying a winch support tower which would bolt on the tongue, I’ve opted to do fore and aft tie-downs; the one running to the rear keeps the boat from moving back and the forward line keep the boat from moving forward.

Photo 7 shows the rear Yakima boat strap that I cut and refitted to act as permanently mounted tie-downs at the front and rear of the trailer. Difficult to see, but I did a lock stitch with a sewing awl to keep the straps from being stolen or possibly loosening during transport. The 1” wide black nylon plastic webbing fixture was purchased from a camping/backpacking supply shop

Photo 8 shows the completed trailer. I’ve installed locking lug nuts and keep cables with padlocks that run through the wheels and around the frame any time the trailer is parked and unattended. Not shown is an “Alarm Lock” which is usually attached to deter theft.

I have a Yakima roof rack and attached the Sea Wing; with the kayak onboard I found the wind drag on the little Honda costs me almost 15MPG. Towing the trailer, as light as it is, has shown no decrease in fuel mileage (38-40MPG) and when a cross wind comes up there is no sway like there was with a kayak top loaded. I like the trailer quite a lot; tows well at speeds well above the highway speed limits, with its long tongue it backs up easily and there is no decrease in fuel mileage… nice product and great modification; I’m quite pleased with the results.

I can use the scupper hole transport cart if needed where there is no launch ramp or when the launch is busy, however in most cases I pull up to the launching area just like a power boater, prep my boat, back the trailer down the launch ramp, off load the kayak with all equipment aboard, park and lock the trailer & car and go fishing. To make this fit another kayak, all I need do is readjust the PVC support tubes which take just a few minutes; it couldn’t be easier.

Seems like everything is a work in progress:

The next priority is an upright fiberglass pole(s), brightly colored, attached to the rear of the trailer channels. The low slung trailer is difficult to see in the side mirrors of those who drive 4x4’s and tall vehicles.

I’ll be re-doing the wiring and likely use 16 gauge tinned marine wire and self gluing heat shrink from West Marine Jewelers.

This winter I’ll redesign the bunks by raising the Uni-struts about 4 inches to clear the fenders, so as to add a second set of tubes to the trailer to pack two kayaks side by side. While I’m at it I’ll not glue in the rear 3” drain covers to aid in cleaning.

Tip: When it comes time to drop the bolt through the 3” tube while simultaneously aligning the bolt to the spring nut; you’ll find it easier if you put doubled over (sticky on both sides) duct tape inside the socket then stick the bolt into the socket so it doesn’t come off during the vertical entry… so much easier.
Put a patch of duct tape on the back side of a boxed end wrench to install nuts in blind locations. Not important on this mod, but works well when needed.

Not very many of the trailer mods are my ideas. Thanks to the Internet and data sharing I’ve been able to make a copy of what others have done before me. Credits go to the Hobie http://www.hobiecat.com/forums/ (scroll down to find Pro-Angler group)and Northwest Kayak Anglers (NWKA) forums http://www.northwestkayakanglers.com/index.php who led me to get more information as well as examples of how others transformed their trailers; and of course “MoFishYaker” who some say was first to put the modification on YouTube. Other sources are popping up all the time; don’t hesitate to look for more ideas if you become interested in this kind of transformation to your trailer.


pmmpete

  • Sturgeon
  • *******
  • Location: Missoula, Montana
  • Date Registered: Jul 2013
  • Posts: 1989
Great job on the trailer!  But I bet you get some flack at invasive species check stations about the drain caps on the PVC pipes.  Any trailer contains numerous nooks and crannies where an invasive species can hitchhike, but I suspect that the check station dudes will focus on the PVC pipes and their semi-sealed drain caps.


NoYaks

  • Rockfish
  • ****
  • Location: Winchester Bay
  • Date Registered: May 2014
  • Posts: 164
Referenced that in the post and made a clean out on the bottom side.
Yea, I know it's a long post, but that's in there somewhere.


NoYaks

  • Rockfish
  • ****
  • Location: Winchester Bay
  • Date Registered: May 2014
  • Posts: 164
PmmPete I took your advice to heart and fixed the end covers.

Cut off 1 1/2" on each end to remove the glued in end covers and replaced them with ones held in place with 1/4-20 4" long SS bolts and SS Nyloc nuts. I marked all the covers where they fit because I did not use a V-block and a drill press to make the holes thereby making them interchangeable. I'll do that this winter when I replace the tubes and do the other mods I mentioned in the post.

Being able to easily remove the covers to clean inside the pipe will keep me out of trouble with the Invasive Species check points. Have never seen inspectors but it's only a matter of time, I'm sure.


CraigVM62

  • Salmon
  • ******
  • Location: Sumner
  • Date Registered: Aug 2011
  • Posts: 579
I am in the process of finishing a trailer myself so was excited to see a thread on the subject.  I could not have clicked on it fast enough.  Very impressive and some great ideas.   What really drew my interest was how it looks in photo 2 with the 2 cross bars running side to side.   Mine is based off a "bit overkill" boat trailer that I want to accommodate 3 to 4 kayaks.   I was going to utilize 2 cross bars as in your photo #2, but wide enough to handle 4 sets of J-Style kayak brackets.  Is what you have shown there something you made or pre-manufactured ?

Again, very impressive looking and I even like how it ties in color wise with your vehicle.  :thumbsup:


I used to think that Bigfoot might exist. Then I saw the reality shows where they are looking for them.  Now I am certain they don't


NoYaks

  • Rockfish
  • ****
  • Location: Winchester Bay
  • Date Registered: May 2014
  • Posts: 164
Lets see if I can answer the question; photo 2 shows the stock Malone trailer with its cross-members (the ones with holes pre-drilled all over the place. On top of the rear Malone cross-member is a 57" piece of Uni-Strut running side to side and way up forward is a much shorter 24" piece of Uni-Strut.

I'm not an electrician however I'm told (correct me if wrong) the Uni-Strut is used to mount electronics on walls. I found the Uni-Strut in 10' Lengths at Home D. Lowe's has the same product, even if, in a different brand name.

There is a problem using the Uni-Strut for mounting Malone, Thule or Yakima J-Mounts. Those mounts wont fit on the 1 5/8" Uni-Strut. My plan for the winter will be to replace the Uni-Strut with 78" Malone Crossbars http://www.maloneautoracks.com/sport-trailers.php#accessories (scroll down the page to MPG-495) or I may adapt 78" Yakima round bars which I already have by using the Malone adapter MPG490.

On that same page you'll see Malone's version of the J-cradle. Explore their site http://www.maloneautoracks.com/. Click on the link "Products" at the upper left and you may get some additional ideas.

I want to go with the Malone or Yakima bars so as to add a bike carrier while the trailer holds two kayaks. I'm pretty sure I'll draw it up on paper a dozen times before I begin the transformation. Since I intend to carry mush lighter kayaks (one under 60# and the other at 86 pounds) than the Pro-Angler for which the schedule 40 3" tubes were designed to carry, I will make the distance between the front and rear crossbars closer and I'm going to play with 2" and 2 1/2" schedule 40 PVC.

But that's for another post with photos.


Elkhornsun

  • Herring
  • **
  • Location: Monterey, CA
  • Date Registered: May 2014
  • Posts: 27
Great job overall on the conversion. Agree about sealing the ends of the PVC to avoid bringing hitch hikers north from Southern CA where many lakes and reservoirs are infested with quagga and zebra mussels.

I would expect the Uni-strut to rust fairly quickly with salt water contact. I have used stainless steel for this sort of project in the past and it adds very little to the overall cost.

You already had the Malone trailer and I looked at whether I could cut the brackets for the cross bars to have the boats lower for sliding off into the water. I use a Yakima now which cannot go into water but my next trailer will be a converted jet ski trailer as they provide the lowest bed for ease of getting the boats into and back out of the water without need for a trolley. With a PA I would buy the cradles from Hobie and use them.

I am curious as to whether or not a Hobie can sit for a period of time face up and not have hull indentation problems.


NoYaks

  • Rockfish
  • ****
  • Location: Winchester Bay
  • Date Registered: May 2014
  • Posts: 164
Most important question: Whether a Hobie can sit for extended periods?
According to the factory rep who maintains a presence at the Hobie forum; he and Hobie has given the thumbs up to the conversion for transporting as well as storage, as long as the dimensions are maintained. Vist their forum to play 20 questions with those guys; several threads going on right now with some excellent trailers: http://www.hobiecat.com/forums/viewforum.php?f=78&sid=7a84534d8330c7c2d3d52413afe29b52

My only reason for the Malone is weight savings. I knew I'd be towing with the new Civic. In Europe the same car receives a 1500 pound rating, here in the US I'm told the DOT has not allowed a rating to be given. That in mind I wanted to go as light as possible. Not that it cannot handle the job; my last Civic a 2002 towed a West Wight Potter 14 sailboat on a Pacific trailer with a combined weight just under 1000 pounds. I put over 100K miles on that car with no major consequences. BTW, prior to the trailer I used my F250 with 460CID which gets about 12MPG vs. the 38-40 in the Honda.  Now the Ford stays parked until I move my RV just twice a year.

With my next version, which will carry two yaks, I'll be using Yakima bars; I picked up the brackets y'day. They too will rust, but I'll give everything a freshwater bath after every immersion.

One of our own; Dr. Steelhead Catcher has quite a bit of great info on the Hobie site right now... check it out


RoxnDox

  • Salmon
  • ******
  • Native Propel
  • Location: Gig Harbor, WA
  • Date Registered: Sep 2013
  • Posts: 677
Very nice!  Is your Civic a gas or hybrid?  I drive an '08 Civic hybrid, and it has no trailer rating.  Although I've certainly thought about putting a light-duty hitch on it...  My transport method right now is a set of Malone inflatable tube racks on the roof, but a trailer is very very appealing...

Jim
Junk Jigs "BEST USE OF ACTUAL JUNK" category - "That tape should have been a prized possession and not junk. That will be a collectors item in 30 years!” & “There sure is a lot of junk in there.”


NoYaks

  • Rockfish
  • ****
  • Location: Winchester Bay
  • Date Registered: May 2014
  • Posts: 164
Plain LX-4 door gasoline version with automatic trans; nothing special. I'm amazed at what today's manufacturers can do with engine size Vs. horsepower Vs. fuel mileage.

I have a Yakima roof rack with Malone SeaWing for my 50 pound kayak and went with the trailer to haul the almost 90 pound barge. The eventual intent is to convert the trailer to haul both. The roof mounted kayak kills the gas mileage, while the trailer as light as it is doesn't seem to bother the mileage much if any. However; if I tried to justify the cost of the trailer against the cost of fuel, it wouldn't work as I drive the Honda about 6,000 miles a year.


RoxnDox

  • Salmon
  • ******
  • Native Propel
  • Location: Gig Harbor, WA
  • Date Registered: Sep 2013
  • Posts: 677
Yeah, the hybrid basically says "don't tow any size trailer or your warranty is voided"...  The inflatable rack is OK, but still gets hard on the paint getting the boat up on the roof by myself.  Real roof racks and rollers would help.  At least my launch points are all within a few miles distance, for the local salt water... 

Jim
Junk Jigs "BEST USE OF ACTUAL JUNK" category - "That tape should have been a prized possession and not junk. That will be a collectors item in 30 years!” & “There sure is a lot of junk in there.”