Welcome, Guest. Please login or register.
June 18, 2025, 10:16:40 PM

Login with username, password and session length

Recent Topics

[Today at 01:58:02 PM]

[June 13, 2025, 07:00:13 PM]

[June 13, 2025, 02:51:47 PM]

[June 12, 2025, 06:51:40 AM]

[June 06, 2025, 09:02:38 AM]

[June 04, 2025, 11:55:53 AM]

[June 03, 2025, 06:11:22 PM]

[June 02, 2025, 09:56:49 AM]

[June 02, 2025, 09:06:56 AM]

by jed
[May 31, 2025, 12:42:57 PM]

[May 26, 2025, 09:07:51 PM]

[May 25, 2025, 12:50:42 PM]

[May 25, 2025, 09:15:49 AM]

[May 24, 2025, 08:22:05 PM]

[May 22, 2025, 05:09:07 PM]

Picture Of The Month


Guess who's back?
jed with a spring Big Mack

Topic: My Trident/Scotty Laketroller downrigger setup, with pictures and an explanation  (Read 12509 times)

0 Members and 2 Guests are viewing this topic.

pmmpete

  • Sturgeon
  • *******
  • Location: Missoula, Montana
  • Date Registered: Jul 2013
  • Posts: 1989
I have outfitted my Ocean Kayak Trident 13’ sit-on-top kayak with a Scotty Laketroller downrigger on a bracket mount.  Pictures of the setup are shown below.  It works well.  My rod is mounted in a rod holder near my feet and sticks out at right angles to the kayak, so I can easily keep an eye on the tip of the rod.  The downrigger is mounted next to my thigh, so I can quickly raise or lower the ball without changing position in my kayak, and so I can control the descent of the ball with my thigh.  I can lean forward and reel in the downrigger ball and my fishing line at the same time.  Neither the rod nor the downrigger gets in the way of my paddle.  With a four pound ball and when paddling at 1 to 1.5 mph, I can troll up to 70 feet deep before the ball gets swept back out of the cone of my sonar.  Even when I’m trolling at 70 feet deep, the ball and cable don’t affect the tracking of my Trident – I don’t have to paddle harder on the side on which the downrigger is mounted.  In still air, I can troll at 1 to 1.5 mph with very little effort.

After the pictures, I explain why I set up my downrigger this way.  Each kayak is different, so it may not be feasible to mount a downrigger on your kayak in the way I mounted one on my Trident, but I hope you will get some ideas about how to mount a downrigger on your kayak from this discussion.  Then, for those who haven’t used a downrigger, I explain how the setup works. 


In Paragraphs 1-9 below, I discuss the reasons I mounted the components of my downrigger system the way I did.  The factors you should consider when deciding how to mount a downrigger system will be similar for all kayaks, but because the design of each kayak model is different, I don’t explain the practical details of how I mounted my downrigger system on my kayak.

1.  Minimize interference with paddling.  If you have a paddle kayak, you have to mount the components of the downrigger where they will interfere as little as possible with paddling.  You won’t be happy with a downrigger setup if you have to paddle in an abnormal manner when using your downrigger, or if you periodically hit your rod with your paddle, or snag your line with your paddle, or bark your knuckles on the downrigger.  Clamp the components of the downrigger in place temporarily and try paddling your kayak, to be sure that the setup won’t get in the way of paddling.  I mounted my rod holder far enough forward that I won’t hit it when I swing my paddle forward.  I found that I had barely enough clearance between my paddle and the rod and line when I used a 6.5 foot long rod, so I started using a 7.5 foot long rod, which provides plenty of clearance for both the rod and the line.  I mounted my downrigger so its cable reel is well inside the outside edge of my kayak, so I won’t hit it with my knuckles when paddling.  I mounted the deck mount for the downrigger on the right (outside) side of the right foot well, rather than in a flush mount on top of the gunwale, in order to move the cable reel lower and about three inches towards the center of my kayak.  I point the arm of my Laketroller downrigger almost straight back, so the pulley only sticks out an inch or so beyond the edge of my kayak.  There is 30 degrees between each slot in Scotty rod holder bases, and initially the end of the metal arm of the downrigger was further away from the side of the kayak than I wanted, so I bent the arm in towards the center of my kayak to keep it out of the way of my paddle.  You can bend the arm towards the center of the kayak all you want without affecting the performance of the downrigger, but you can’t bend the arm of the downrigger down very much, because the cable will start to run across the lower side of the cable reel rather than feeding the cable into the center of the reel.

If you have a Hobie Mirage Drive kayak, you have to mount the downrigger where it won't interfere with your legs when you are pedaling, but interference with paddling is much less of a concern.  I have a Scotty Depthmaster downrigger mounted next to my right thigh in my 13' Hobie Revolution.  That downrigger is much bigger than the Scotty Laketroller, and it definitely gets in the way of paddling.  But I can live with the interference, because I only need to use a paddle to get a few feet to the shore after the water gets too shallow for the Mirage Drive.  If I needed to paddle through surf (not an issue where I live in Montana), or I had to paddle across large shallow flats, I'd take the Depthmaster out of its mount so I could paddle without interference from the downrigger.

2.  Minimize interference with the performance of the kayak.  The more the arm of the downrigger sticks out past the side of your kayak, the more the drag of the ball and cable will make your kayak turn towards the side on which the downrigger's pulley and cable are located.  With the pulley mounted about an inch from the side of my Trident, even with the ball at 70 feet, the kayak tracks normally without using a rudder, and I don’t have to paddle harder on the side on which the downrigger is mounted. If your kayak has a rudder, any effect which the ball and cable have on the tracking of your kayak will be less obvious, because you can compensate for it by tweaking the angle of your rudder.  The higher the downrigger is mounted, the more it will interfere with the stability of your kayak, so mount it as low as possible.  I haven’t experimented with moving the downrigger forwards and backwards on either of my kayaks, but I suspect that the further back the pulley is located, the less the cable and ball will interfere with the tracking of your kayak.  However, if you want to be able to pick the downrigger ball out of the water with your hand while sitting normally in your seat, you can’t locate the downrigger pulley too far back.  If you locate the downrigger pulley towards the stern of your kayak in hopes of minimizing the effect of the system on steering, or due to restrictions on where you can mount a downrigger on your kayak, you’ll need to use a ball retriever ring to pull the ball out of the water, which would be less convenient.  In my experience, when the pulley is located next to my right hip, the drag of the cable and ball doesn’t affect the tracking of my Trident, so it may not be necessary for you to locate the pulley further back on your kayak.

3.  Minimize interference with your fish finder.  You need to mount the rod holders and the downrigger where they don’t interfere with your view of your fish finder.  And you need a fish finder.   You can't use a downrigger safely and effectively unless you have a fish finder to tell you where the ball is with respect to the bottom, and where the fish are with respect to the ball and the bottom.  If you haven't mounted your fish finder yet, consider mounting it on the gunwale on the side of your kayak on which the downrigger pulley is located, and towards which your rod points, as mounting it there will make it easier to keep an eye on the fish finder and the tip of your rod at the same time. 

4.  Mount it securely to your kayak.  A Scotty Laketroller is essentially a 14 inch long pry bar bolted to your kayak, and a Scotty Depthmaster is essentially a 23 inch long crowbar bolted to your kayak.  If you hook the downrigger ball on the bottom, the cable will try to tear the downrigger out of your kayak.  Cranking on the handle of your downrigger also puts stress on the mount of the downrigger. You need to devise a mount for your downrigger which spreads the stress created by the downrigger out over a big enough area, and in a direction, which minimizes that chances that the downrigger will damage your kayak, or rip itself out of your kayak and disappear into the water.  One way you can reduce the stress which a downrigger places on your kayak is by shortening the arm of the downrigger.  However, if you just shorten the arm, the cable will end up running over the bottom side of the cable spool, rather than feeding into the center of the spool.  You need to bend the shortened arm up, or otherwise relocate the pulley, so the cable feeds into the center of the cable spool.

5.  Minimize the additional hardware on your kayak.   I tried to find a way of mounting a downrigger which involves a minimum of hardware.  The only addition I needed to make to my Trident was to mount a Scotty rod holder deck mount next to my right thigh.  The downrigger is small enough so I can stash it inside my kayak or behind my seat when I head out, and quickly set it up while I'm on the water if I decide to use it.

6.  Make it easy to operate.   When using a downrigger, you need to be able to raise and lower both the ball and your fishing line quickly and easily, preferably without changing position, and preferably while continuing to glide forward.  And you need to be able to pick the ball up out of the water easily, also preferably without changing position.  If you mount the downrigger behind your seat, it will be awkward to raise and lower the ball, and you may need to turn sideways in the kayak and put your feet in the water in order to raise and lower the ball and to pick the ball up out of the water, which is inconvenient and may stop the forward motion of your kayak.  You also need to be able to reach your rod easily, so you can raise and lower your fishing line, and so when you get a bite you can quickly grab the rod, pop the line out of the downrigger release, and start playing the fish.  When lowering the ball, I can lean my thigh against the cable reel and let the ball down little by little by releasing pressure with my leg while continuing to paddle forward.  When raising the ball, I can lean forward and crank up the downrigger cable with my right hand and crank up my fishing line with my left hand at the same time.

7.  Minimize interference with getting in and out of the kayak.  For safety reasons, the downrigger should be mounted in a position where it interferes as little as possible with getting in and out of the kayak, and where it won’t trap you in your kayak if the kayak capsizes.  The location of my downrigger next to my right thigh isn’t ideal from this standpoint, because it makes it harder to climb out of the right side of my kayak.  I have to slide forward of the downrigger before I swing my feet out of the right side of my kayak.

8.  Which side of the kayak?    You should mount your rod holder so the crank handle of your fishing reel is accessible when the rod is in the holder.  For example, I use a star drag trolling reel which is mounted on top of the rod, and has its handle on the right side of the reel.  Because I use a rod holder which holds the reel on top of the rod, I need to point the rod towards the right for the handle of the reel to be accessible, which means I need to position my downrigger's pulley on the right side of my kayak.  If I used a rod holder which allowed the reel to hang below the rod, such as a Scotty Rocket Launcher rod holder, I’d need to point the rod towards the left for the handle of the reel to be accessible, so I'd need to position the downrigger's pulley on the left side of my kayak.

9.  Make it easy to monitor.   You should mount the rod in a location where you can see the tip of the rod easily, so you can tell when you get a strike.  If you have to look over your shoulder to see the tip of your rod, the downrigger will be inconvenient and uncomfortable to use, and you will be more likely to miss strikes.  I met a kayak angler who has a Go-Pro video camera mounted on the bow of his kayak.  When reviewing footage taken while he was trolling, he was surprised to discover how frequently he missed strikes because he wasn't looking at the tip of his rod.  I suggested that he assemble a "blooper" video showing a bunch of strikes he missed because he was looking away from the tip of his rod.

10.  Make it easy to assemble and disassemble.  The downrigger should be easy to assemble and disassemble, and it shouldn’t interfere with transporting your kayak.  My Scotty Laketroller downrigger is mounted on a standard rod holder deck mount, so I can remove it from the kayak in a couple of seconds.  I mounted the deck mount where it doesn’t stick up above the top of the kayak, so the mount won’t interfere with sliding the kayak around on roof racks.

If you haven’t used a downrigger, here’s how mine works:  Let’s say I’m paddling along in 50 feet of water, with the downrigger ball sitting in the foot well or next to my hip.  On my fish finder, I see what looks like a school of kokanee about 30 feet down.  I release the drag on my fishing reel, and while continuing to paddle forward, I feed out 30-40 feet of line.  A reel with a line counter makes this easier.  I try to feed out the line when paddling downwind, so the wind won’t blow me back over my line when I stop paddling to attach my fishing line to the downrigger release which is mounted on top of the ball.  Because I use braided line, I use a Blacks or Chamberlain clip-style release attached to the top of my ball, rather than one of the pinch-style releases used with monofilament.  To attach my line to the release, I make a loop in the line, twist the loop 6 or 8 times, and clip the wire clip on the release through the loop.  Then I set the ball into the water next to my kayak, resume paddling to keep my line and lure streamed out behind my kayak, and start lowering the ball.  To lower the ball, I first release the spool on my trolling reel and engage the clicker, so fishing line will feed out automatically as I lower the ball, but won't free-wheel out.  Then I loosen the nut which holds the downrigger cable reel and start lowering the ball.  I can hold the cable reel in place with my thigh and lower the ball little by little by releasing pressure while continuing to paddle forward.  I can see the ball descending on my fish finder.  When the ball reaches the level of the school of fish, I lock the cable reel by tightening the nut.  Then I reel up fishing line until my rod bends, in order to keep the fishing line under tension between the tip of my rod and the ball.  If you bend the rod too much, it will be harder to get your rod out of its holder when you get a strike.  If you don’t bend the rod very much, strikes won’t be as obvious, and you'll have more curvature to take out of your line when you go to pop the line out of the release and set the hook.  The lure will be trailing out behind the ball at about the same depth as the ball, or somewhat lower if you are using a diving lure.  Then I troll back through the area where I saw the school of fish on my fish finder.  While paddling, I keep watching both the fish finder and the tip of my rod.  If I see fish at a greater depth, I can quickly drop the ball to a lower level, in the manner described above.  If I see fish at less depth, or the water gets shallower, I can crank the ball up with my right hand and the fishing line with my left hand at the same time.  If I get a strike, the tip of my rod will start to bounce.  If the fish is big, the strike may pop the line out of the downrigger release.  I drop my paddle, grab my rod out of its holder, quickly reel in some line, pop the line out of the downrigger release, and set the hook.  Then I start playing in the fish.  In order to prevent the fish from wrapping my fishing line around the downrigger cable, as soon as I get solid tension on the fish, I hold the pole with my left hand while quickly cranking up the downrigger ball with my right hand.  If I need to reel in more fishing line, I hold the cable reel in place with my thigh while playing in the fish.  Then I resume cranking up the ball.  When the ball reaches the pulley, I lock the cable reel and can focus my attention on playing in the fish

I’m happy with the setup of my downrigger.  It’s convenient to use, works well, allows me to precisely control the depth at which I am trolling, and allows me to change the trolling depth quickly as fish appear at a different depth, or the water gets deeper or shallower.  It has allowed me to catch fish which I was unable to reach with other methods of trolling such as lead line.
« Last Edit: March 10, 2015, 09:35:03 AM by pmmpete »


Captain Redbeard

  • Lauren
  • Global Moderator
  • Sturgeon
  • *****
  • Location: Portland, OR
  • Date Registered: May 2013
  • Posts: 3337
Wow this is an awesome write-up! I love seeing content like this. Thank you for the work you put into sharing this information with us!


rbchar

  • Perch
  • ***
  • Location: Sagle, Idaho
  • Date Registered: Jun 2012
  • Posts: 65
Nice mack!
Grant-Sandpoint, ID


C_Run

  • Sturgeon
  • *******
  • Location: Independence, OR
  • Date Registered: Apr 2011
  • Posts: 1239
Great write up, thanks. I had a tough day of trying to jig for kokes in the wind yesterday. This set up would have been just what was called for.
« Last Edit: August 02, 2013, 12:45:51 PM by C_Run »


  • Location: Warrenton, OR
  • Date Registered: Oct 2009
  • Posts: 405
Excellent write up.......One thing I found useful is to change out the stainless cable for 80 pound test spectra line...green color.....it significantly reduces "cable hum" and drag in the water due to a smaller OD.


pmmpete

  • Sturgeon
  • *******
  • Location: Missoula, Montana
  • Date Registered: Jul 2013
  • Posts: 1989
Nice mack!
Grant-Sandpoint, ID
I thought about showing a picture of a typical small-but-tasty Montana Kokanee:


But decided that a picture of a lake trout would be more impressive.


pmmpete

  • Sturgeon
  • *******
  • Location: Missoula, Montana
  • Date Registered: Jul 2013
  • Posts: 1989
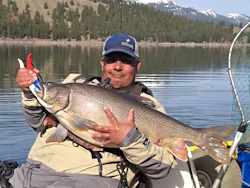
The downrigger strikes again - a beefy 29 inch lake trout I caught on Saturday.


rimfirematt

  • Salmon
  • ******
  • Hit Me up on Facebook!
  • Location: Eagle River, Ak
  • Date Registered: Feb 2012
  • Posts: 658


rbchar

  • Perch
  • ***
  • Location: Sagle, Idaho
  • Date Registered: Jun 2012
  • Posts: 65
Yeah, rather see the macks over kokes!!
You fish Flathead Lake?? Or closer to Missoula?
Kokes in Lake Pend Oreille are just a bit bigger. Lots of 10-12 inchers.
I hear the kokanee at Lake Kookanoosa is very good this season and lots of local folks going there as the limit is more than on LPO.
Thanks for sharing!
Grant


C_Run

  • Sturgeon
  • *******
  • Location: Independence, OR
  • Date Registered: Apr 2011
  • Posts: 1239
I have notes taped to my rod pod , too, but not sure they have helped so far. I'd love to hook a big mac like that. Nice work.


pmmpete

  • Sturgeon
  • *******
  • Location: Missoula, Montana
  • Date Registered: Jul 2013
  • Posts: 1989
I have notes taped to my rod pod , too, but not sure they have helped so far. I'd love to hook a big mac like that. Nice work.
That isn't notes on my rod pod, it's a bathymetric map (an underwater topo map), which is really helpful when trolling with a downrigger.  For example, if I've been finding lake trout hanging out on the bottom at the base of a slope which rises from a flat area, I might decide to follow the 55 foot contour line along the base of the slope, trolling my ball about five feet above the bottom.  The map helps me plan my route and know what to expect.  For example, if there is a ridge in the slope, I can predict that I will need to veer out towards the deeper water to avoid running my ball into the ridge.
« Last Edit: August 05, 2013, 01:49:07 PM by pmmpete »


pmmpete

  • Sturgeon
  • *******
  • Location: Missoula, Montana
  • Date Registered: Jul 2013
  • Posts: 1989
Excellent write up.......One thing I found useful is to change out the stainless cable for 80 pound test spectra line...green color.....it significantly reduces "cable hum" and drag in the water due to a smaller OD.
How well does spectra line hold up compared to cable?  Does it get abraided?  Do you feel like you need to periodically retie the knot on the clip at the end of the line, or replace the line entirely?  I'd hate to lose a ball because the spectra wore out.

I wish my fish finder was fancy enough to tell if the hum from my cable was scaring fish away.  For example, as I troll along a few feet above the bottom, my fish finder frequently shows fish (presumably lake trout) rising up off the bottom towards the level of my ball.  What I don't know is if they are heading in to look at my lure, or heading away from the annoying or scary hum.


Rory

  • Sturgeon
  • *******
  • Rory's Internets Audio Blog
  • Location: Bellingham, WA
  • Date Registered: Jan 2010
  • Posts: 1818
The downrigger strikes again - a beefy 29 inch lake trout I caught on Saturday.


crikey that's a nice mackinaw!  that's one fish I really would love to catch.
"When you get into one of these groups, there's only a couple ways you can get out. One, is death. The other...mental institutions"


  • Location: Warrenton, OR
  • Date Registered: Oct 2009
  • Posts: 405
My Canon mini-trol comes with a well designed, single cable termination P/N 2250141...it really protects the cable/line and makes connecting the weight and release clip simple.
When using spectra line on this termination, I needed to tie a different knot so it would not slip.

As far as damage to the spectra line.....so far, so good and no damage.
The spool of Spectra line I loaded was 125 yards/375 feet.....so if some damage was detected, its easy to strip off some line and still have plenty for trolling.....I rarely troll deeper than 80 feet.
The stainless steel  cable buzz is distracting to me and I can't answer if it bugs fish or not.


pmmpete

  • Sturgeon
  • *******
  • Location: Missoula, Montana
  • Date Registered: Jul 2013
  • Posts: 1989
My Canon mini-trol comes with a well designed, single cable termination P/N 2250141...it really protects the cable/line and makes connecting the weight and release clip simple.
When using spectra line on this termination, I needed to tie a different knot so it would not slip.

As far as damage to the spectra line.....so far, so good and no damage.
The spool of Spectra line I loaded was 125 yards/375 feet.....so if some damage was detected, its easy to strip off some line and still have plenty for trolling.....I rarely troll deeper than 80 feet.
The stainless steel  cable buzz is distracting to me and I can't answer if it bugs fish or not.
You suggested replacing the cable on my Scotty Laketroller downrigger with 80 pound Spectra line.  There are several brands of 80 pound test microfiber braided line available locally, but no Spectra line.  Is Spectra line stronger than other kinds of braided line?  Should I order some Spectra line from out of town, rather than using what is available locally?

It's scary how thin 80 pound braided line is.  I'd be nervous about breaking the line and losing a ball if I snagged the ball.  I'd be real careful as I brought the ball up to the surface, and would try not to bang the ball connector into the pulley, as that would put a lot of stress on the knot at the end of the line.  What knot have you been using on the end of the line?


anything